User Dashboard
Your personal view of the Cash Advance Portal — track the status of every request you raise, see what needs liquidating, and start a new request in one place.
1Accessing your dashboard
Before you can raise a request, you need an approved account. Sign up once, wait for the administrator to approve your credentials, then log in to reach your User dashboard.
-
Sign up
Enter your preferred login credentials and select the role
USER.Username requirement Your username must follow the First Name (space) Last Name format — for example,Juan Dela Cruz.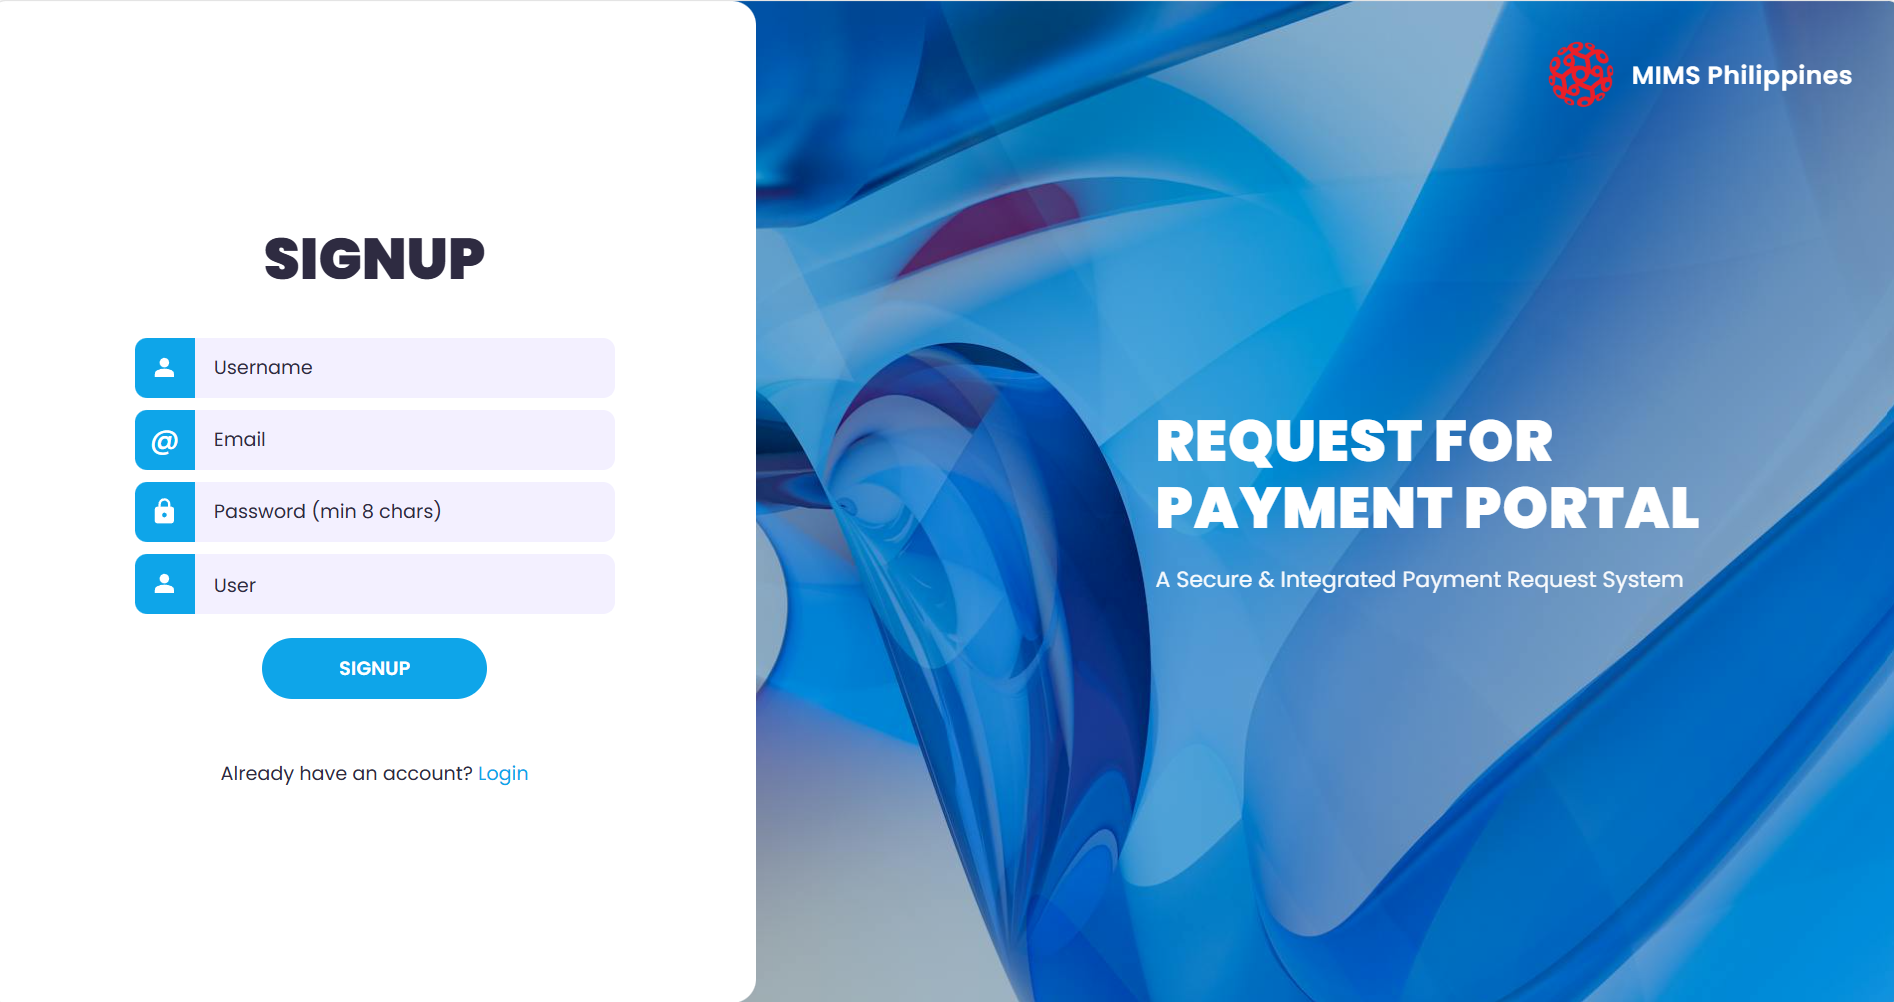
The sign-up screen — enter your credentials and choose the USER role. - Wait for approval Wait for the admin notice confirming that your log-in credentials have been approved.
-
Log in
Enter your registered username and password, then click the
Log Inbutton to access your dashboard.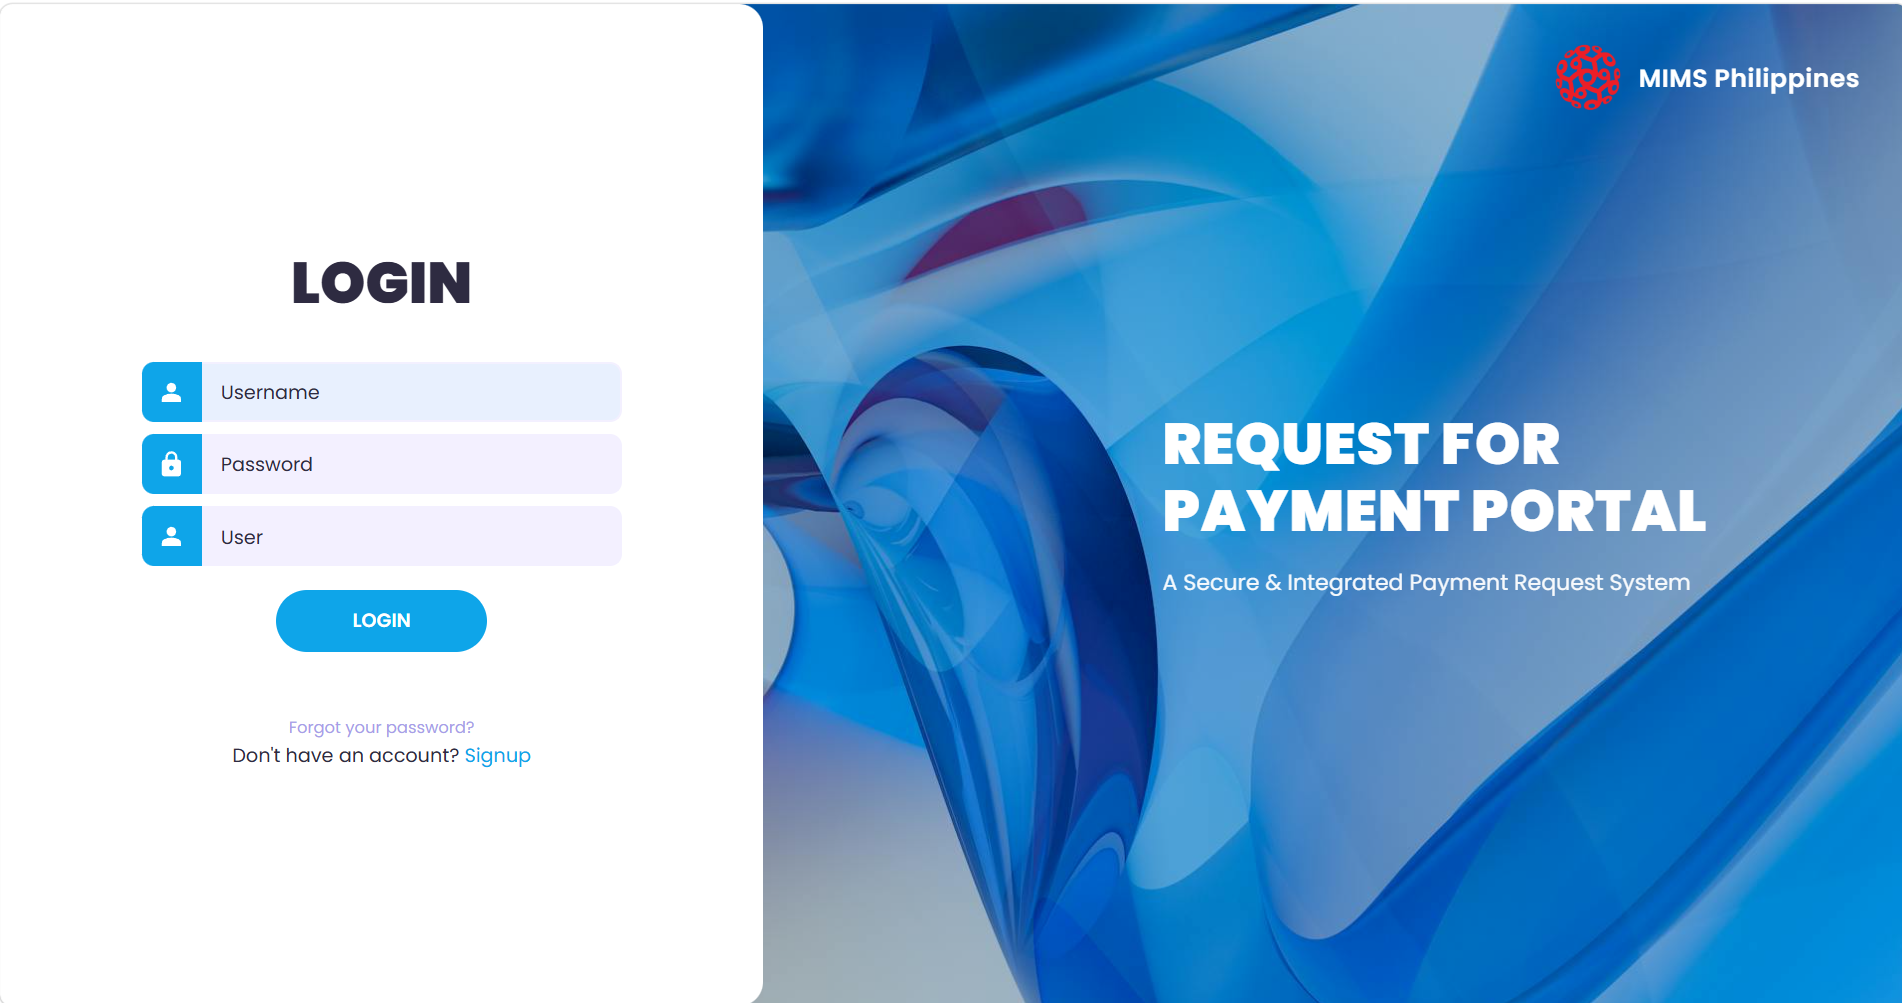
The log-in screen — enter your registered username and password.
2Dashboard overview
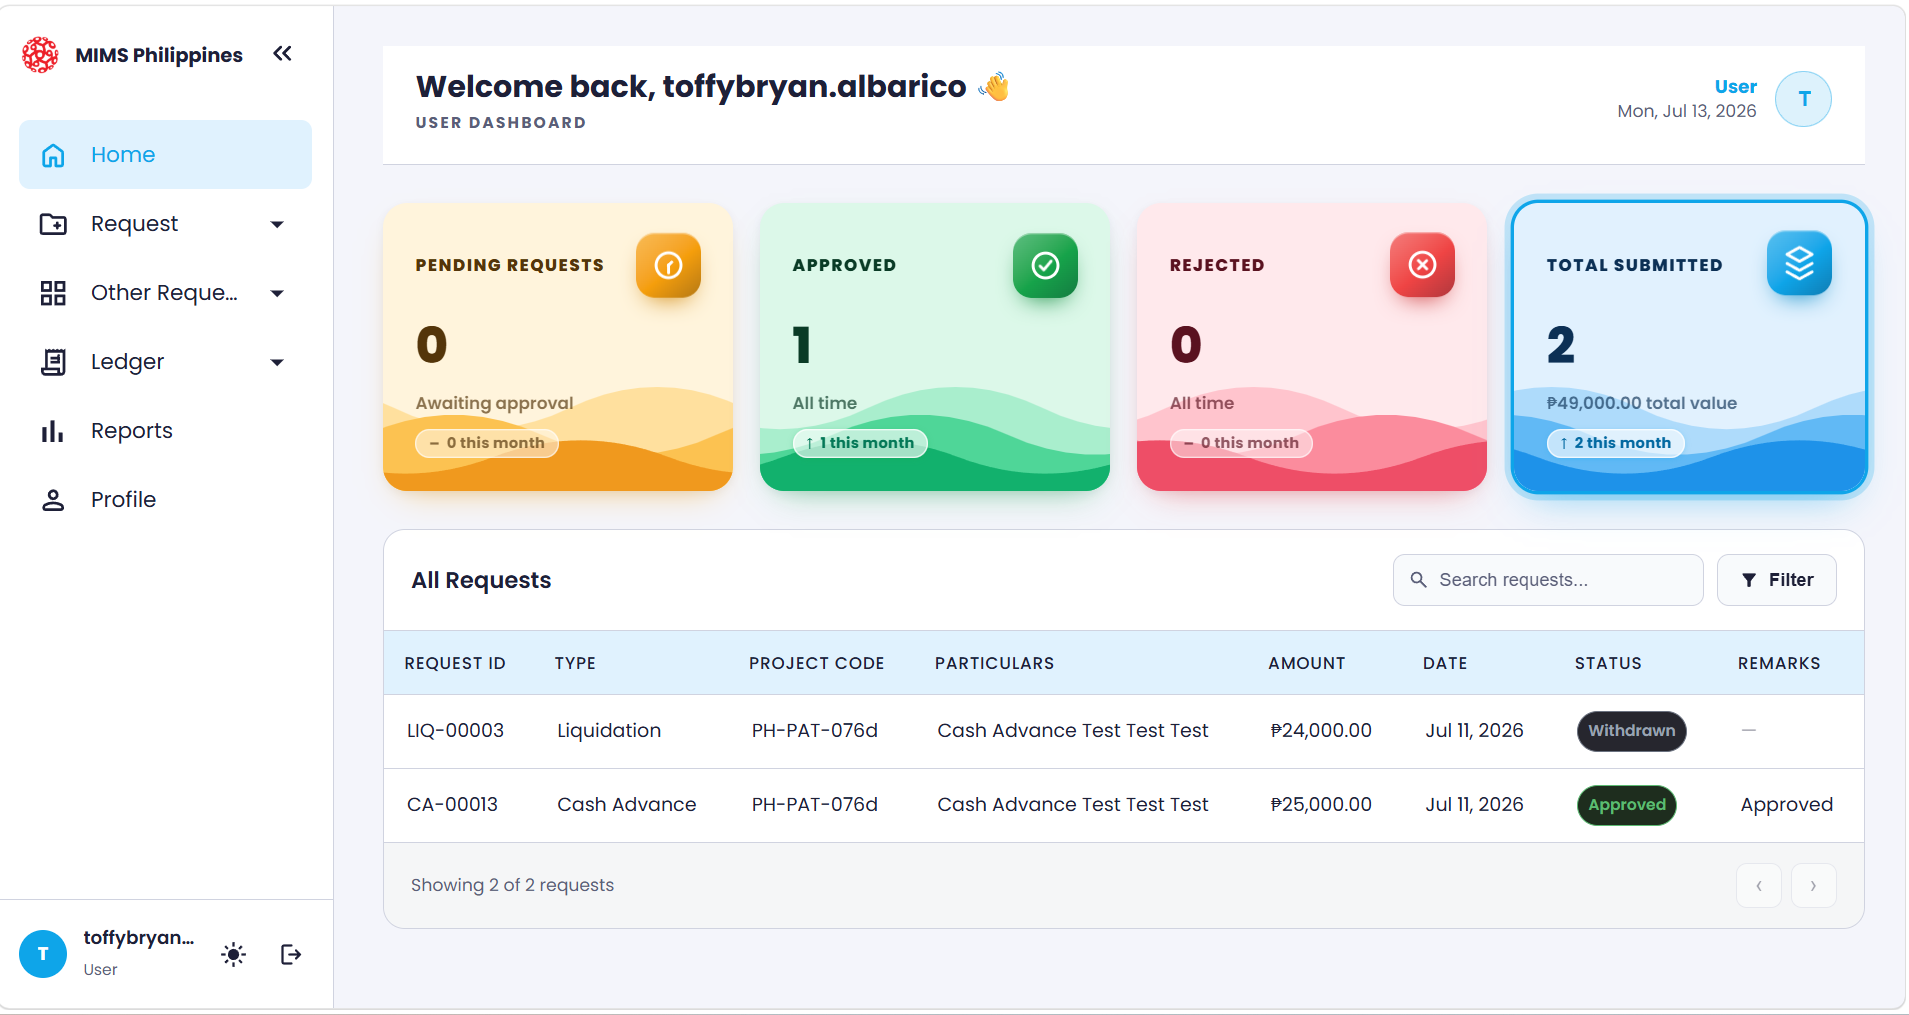
The dashboard is the main page where you monitor request activity, view request statuses, and reach request-related modules such as Cash Advance, Liquidation, reports, profile, and ledger information.
At a glance, the dashboard helps you see:
- How many requests are pending
- How many requests have been approved
- How many requests have been rejected
- The total submitted requests
- The details of each submitted request
2.1Dashboard layout
The dashboard is divided into three main areas:
- Left navigation menu
- Top header
- Main dashboard content
2.2Left navigation menu
The left navigation menu is your jump-off point to every part of the portal. Each item is described below.
2.2.1Home
The Home menu displays the main dashboard summary. Use this page to view request counts and the list of all submitted requests.
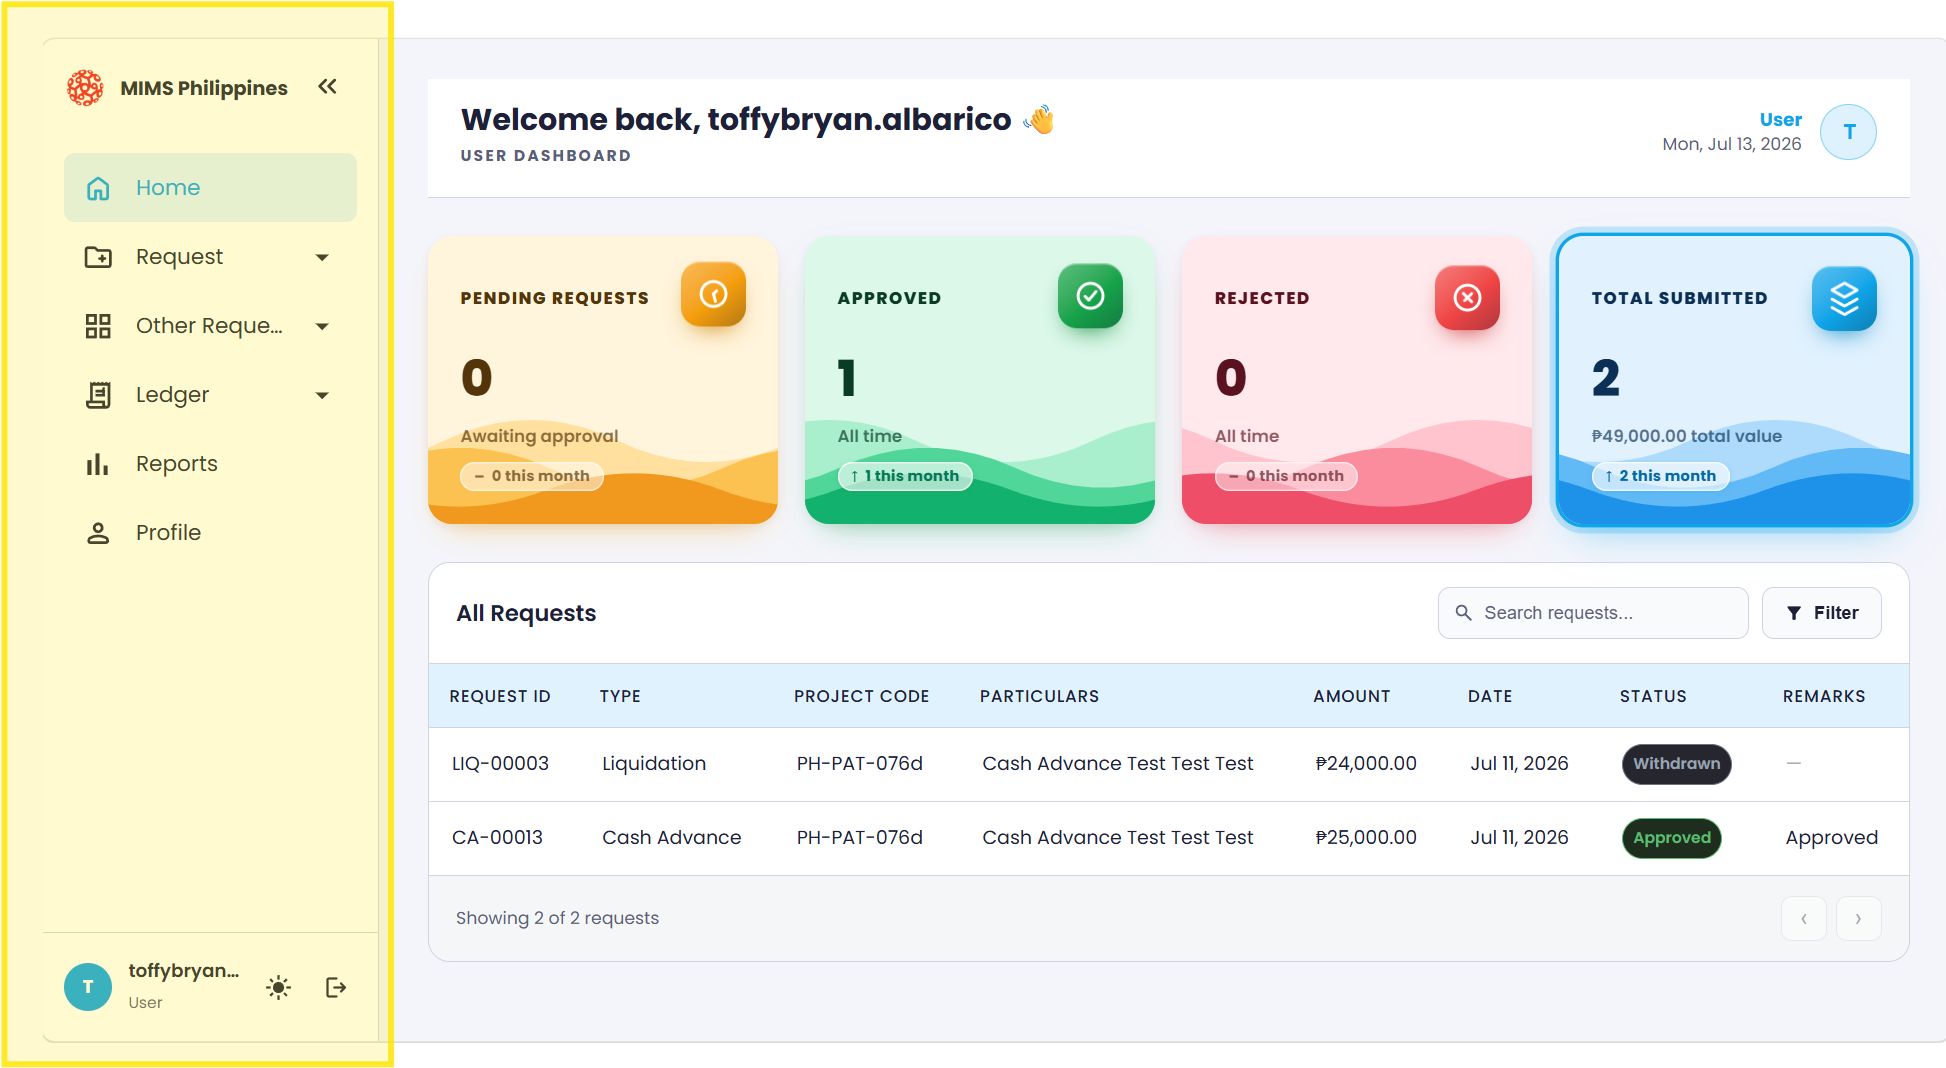
2.2.2Request
The Request menu is used to create or manage request transactions. A dropdown arrow sits beside it — clicking it reveals the Cash Advance module.
2.2.3Other Request
The Other Request menu is used for request types outside the regular request process. It also has a dropdown arrow, indicating additional options are available.
2.2.4My CA Ledger
The My CA Ledger menu lets you view your Cash Advance ledger. This section is useful for checking:
- Cash advance records
- Outstanding balances
- Liquidation history
- Approved or submitted cash advance transactions
2.2.5Reports
The Reports menu lets you view or generate reports related to requests. Reports may include summaries of:
- Cash advances
- Liquidations
- Request statuses
- Submitted transactions

2.2.6Profile
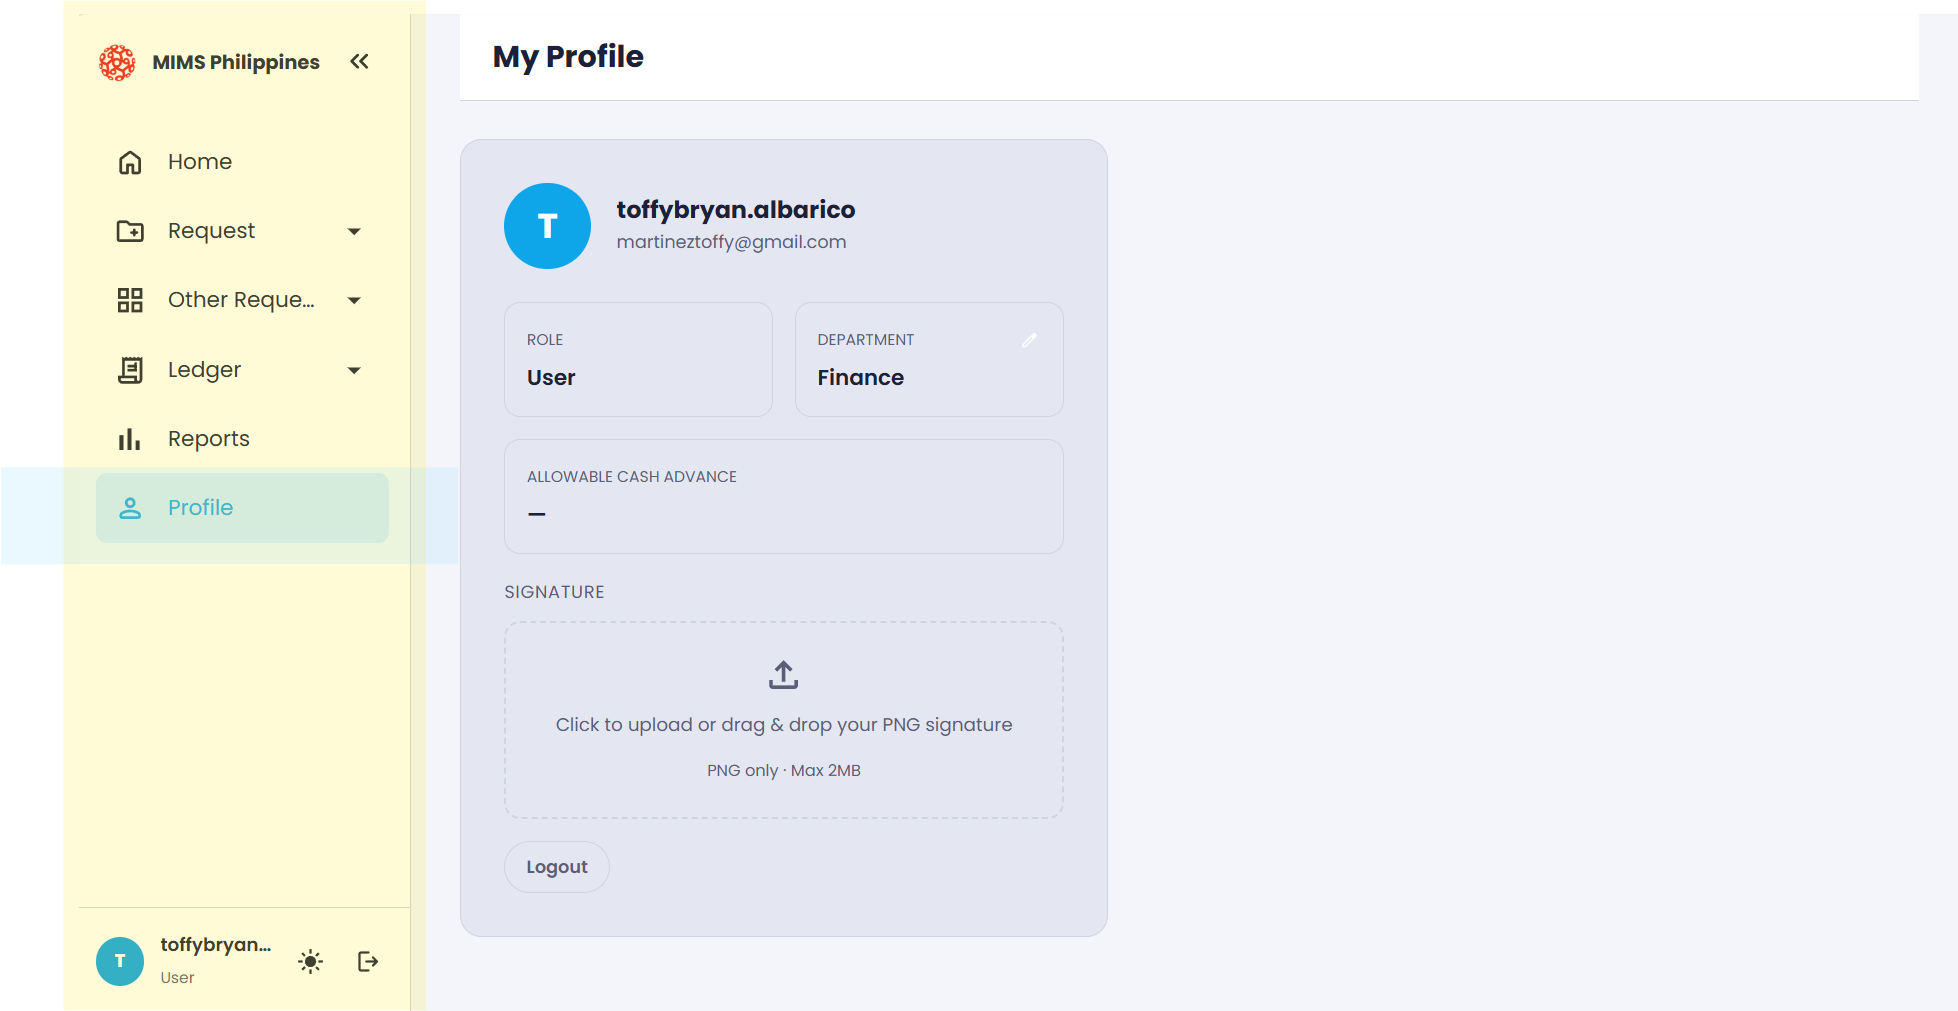
The Profile menu lets you view or manage your account information. This may include your user details, role, or account settings.
3New cash advance request
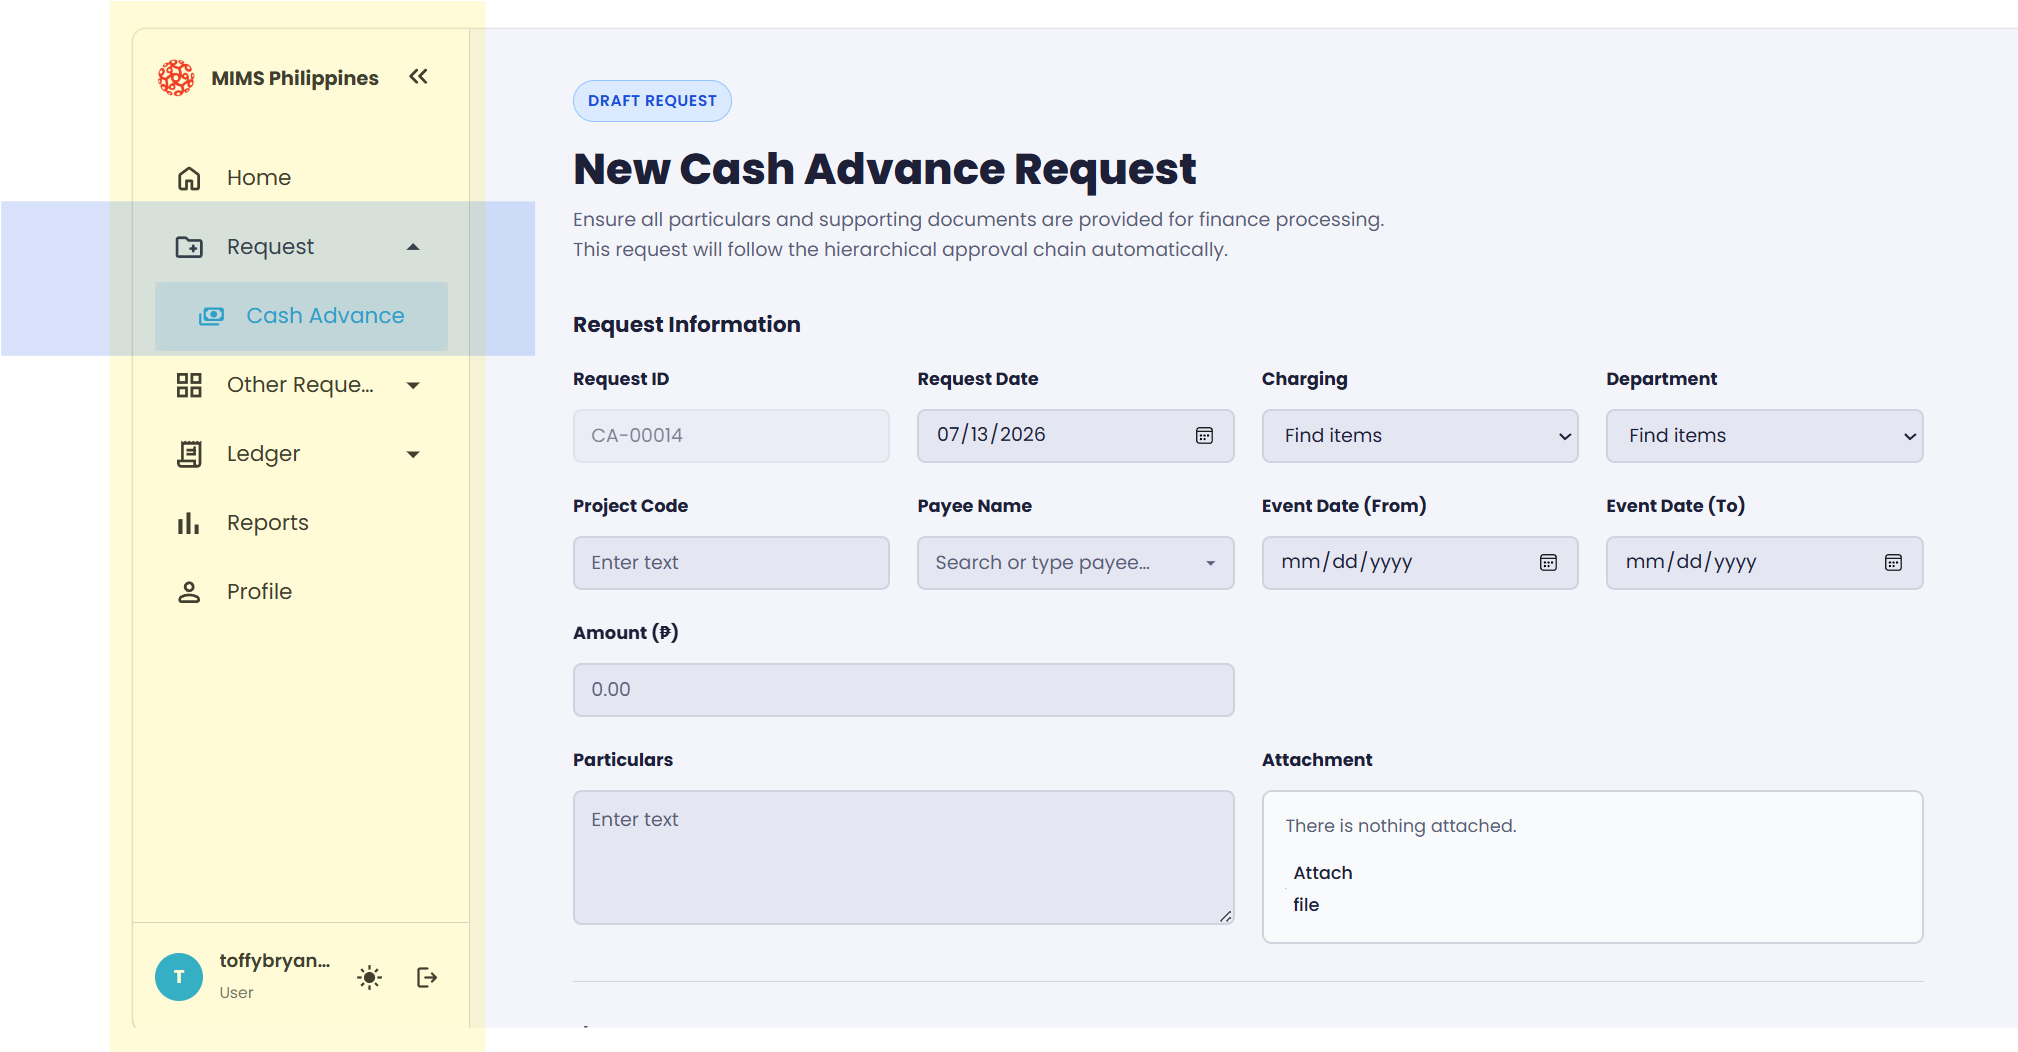
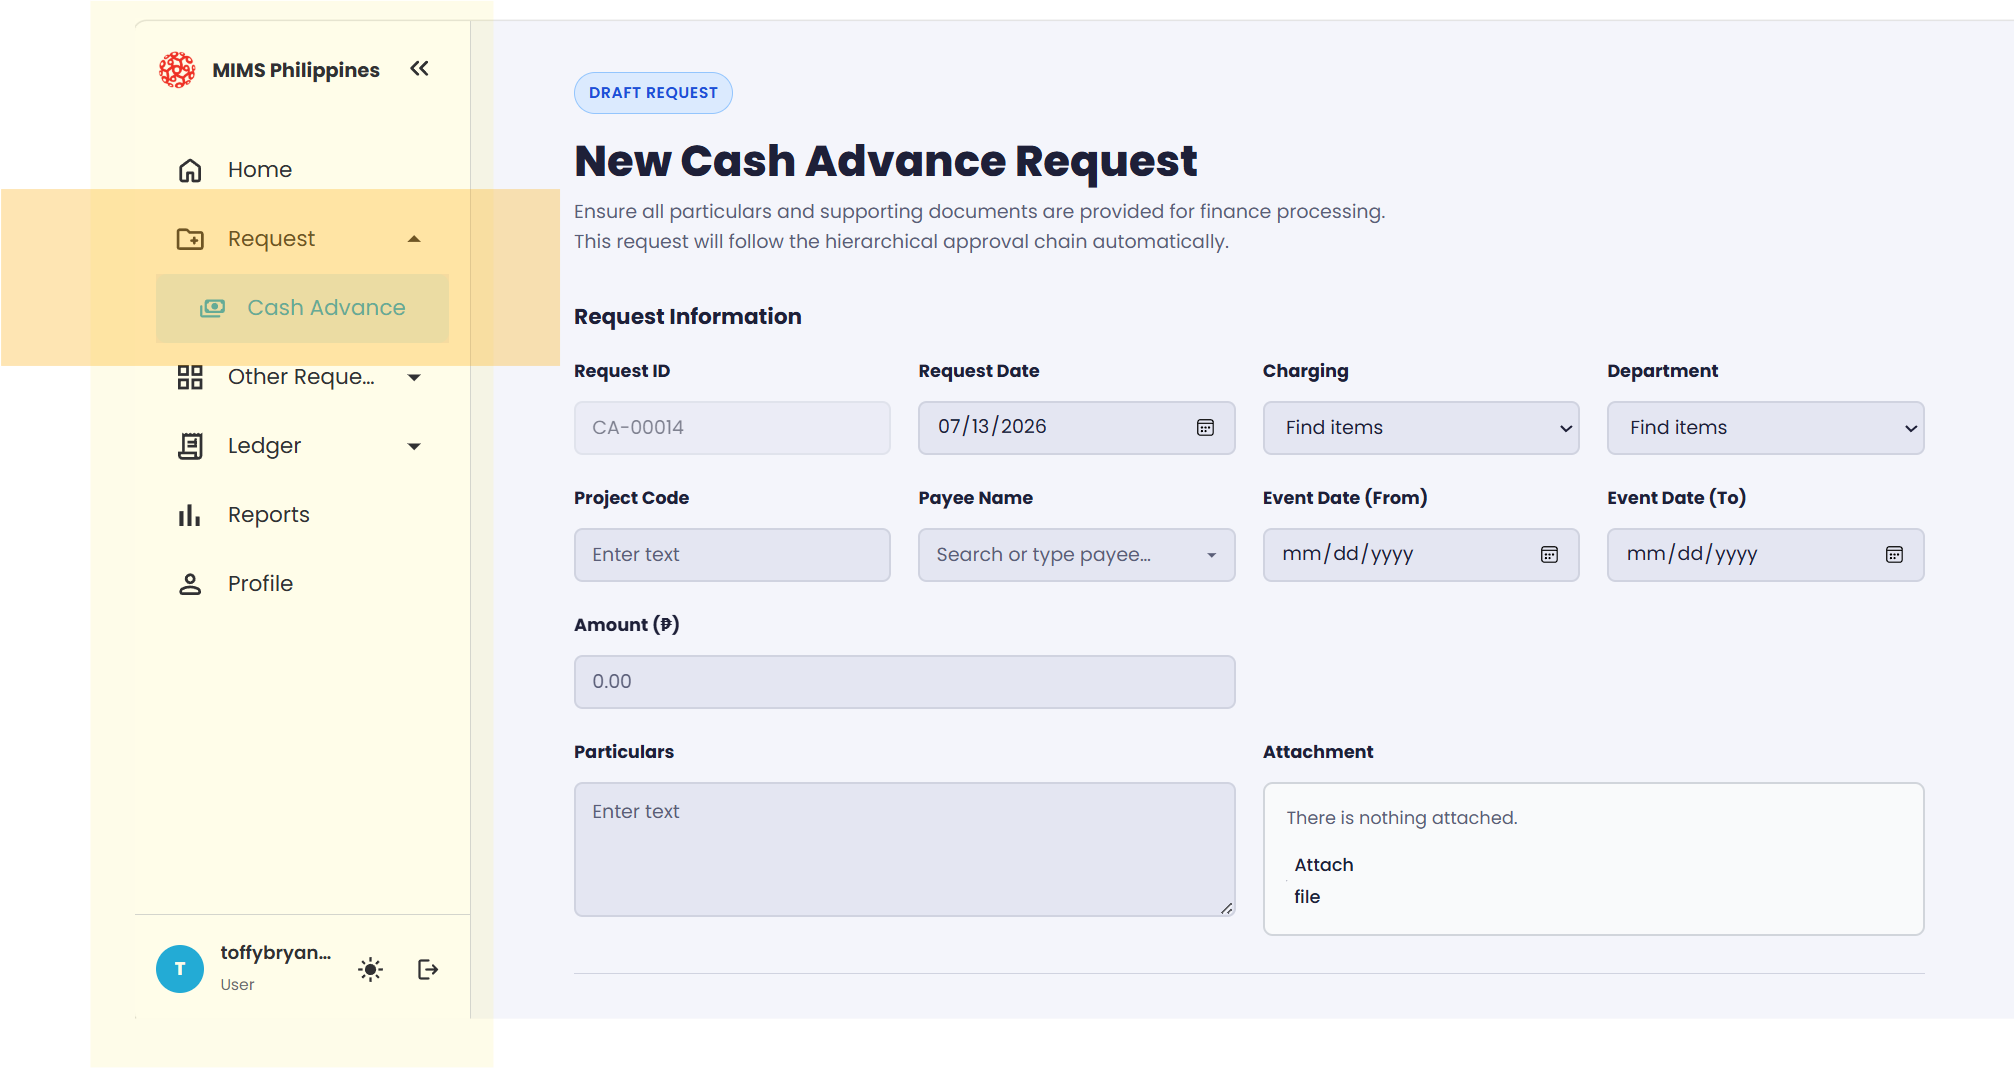
The New Cash Advance Request page is used to create and submit a cash advance request for approval. The form collects the key details — request date, project code, payee name, amount, event dates, supporting documents, and approvers.
Once submitted, the request automatically follows the company's hierarchical approval process.
3.1How to access the page
To open the form:
- Go to the left sidebar menu.
- Click
Request. - Select
Cash Advance.
The system then displays the New Cash Advance Request form, and the menu item you selected stays highlighted in blue.
3.2Request Information section
The Request Information section holds the main details of the request, so be specific and accurate when filling it in.
3.2.1Request ID
Generated automatically by the system — for example, CA-00005. This field is usually not editable, as it serves as the unique reference number for the request.
3.2.2Request Date
Shows the date the request is created — for example, 06/25/2026. You can select or confirm the date using the calendar icon.
3.2.3Charging
Selects where the expense will be charged. Click the dropdown labelled Find items and choose the applicable charging category. This helps Finance identify the correct account, cost center, or charging allocation.
3.2.4Department
Identifies the department related to the request. Click Find items and choose the correct department from the list.
3.2.5Project Code
Enter the applicable project code. The project code must always be keyed in in SMS. Make sure it is accurate, as it affects cost tracking and reporting.
3.2.6Payee Name
Indicates the person or entity who will receive the cash advance. Click the Payee field and choose the employee from the directory list.
The selection — not the typed text — is what counts. Typing over your choice clears it until you pick a name from the list again.
3.2.7Event Date From
The start date of the activity or event related to the cash advance. Click the calendar icon to select a date.
3.2.8Event Date To
The end date of the activity or event related to the cash advance. Click the calendar icon to select the end date.
3.2.9Amount
The requested cash advance amount, entered in Philippine Peso value. Double-check the amount before submitting the request.
3.2.10Particulars
Explains the purpose of the cash advance. Include details such as:
- Project code
- Purpose of the request
- Event or activity name
- Travel details, if applicable
- Meal or transportation details
- Miscellaneous expense details
- Business reason for the advance
Example: PH-NAT-078a — Cash advance for meals and transportation for the project meeting on June 25, 2026.
Keep the particulars clear and complete to avoid delays in approval or Finance processing.
3.2.11Attachment section
Used to upload supporting documents. To upload a file:
- Click
Attach file. - Select the supporting document from your computer.
- Wait for the file to attach successfully.
Supporting documents may include:
- Approved budget / cost estimate
- Contracts
- Quotation
- Email threads
- Meeting invitation
- Supporting approval documents
Attachments help Finance validate the request.
3.2.12Department Approvals section
Defines the approval flow for the request. If your department does not require two or three approvals, you may set Reviewed By and Noted By to Not Required.
3.2.13Authority to Deduct section
This section contains an authorization statement allowing MEDIMARKETING INC. to deduct from your salary, benefits, or other amounts due in case of any unliquidated or outstanding cash advances beyond the prescribed liquidation period.
- Do not submit incomplete cash advance requests.
- Always attach the required supporting documents.
- Use the correct project code and department.
- Ensure the request amount matches the supporting documents.
- Select the correct approvers to avoid approval delays.
- Liquidate the cash advance within seven (7) days after the related event.
- Employees with outstanding or unliquidated cash advances may not be allowed to request another cash advance.
4Liquidating cash advance
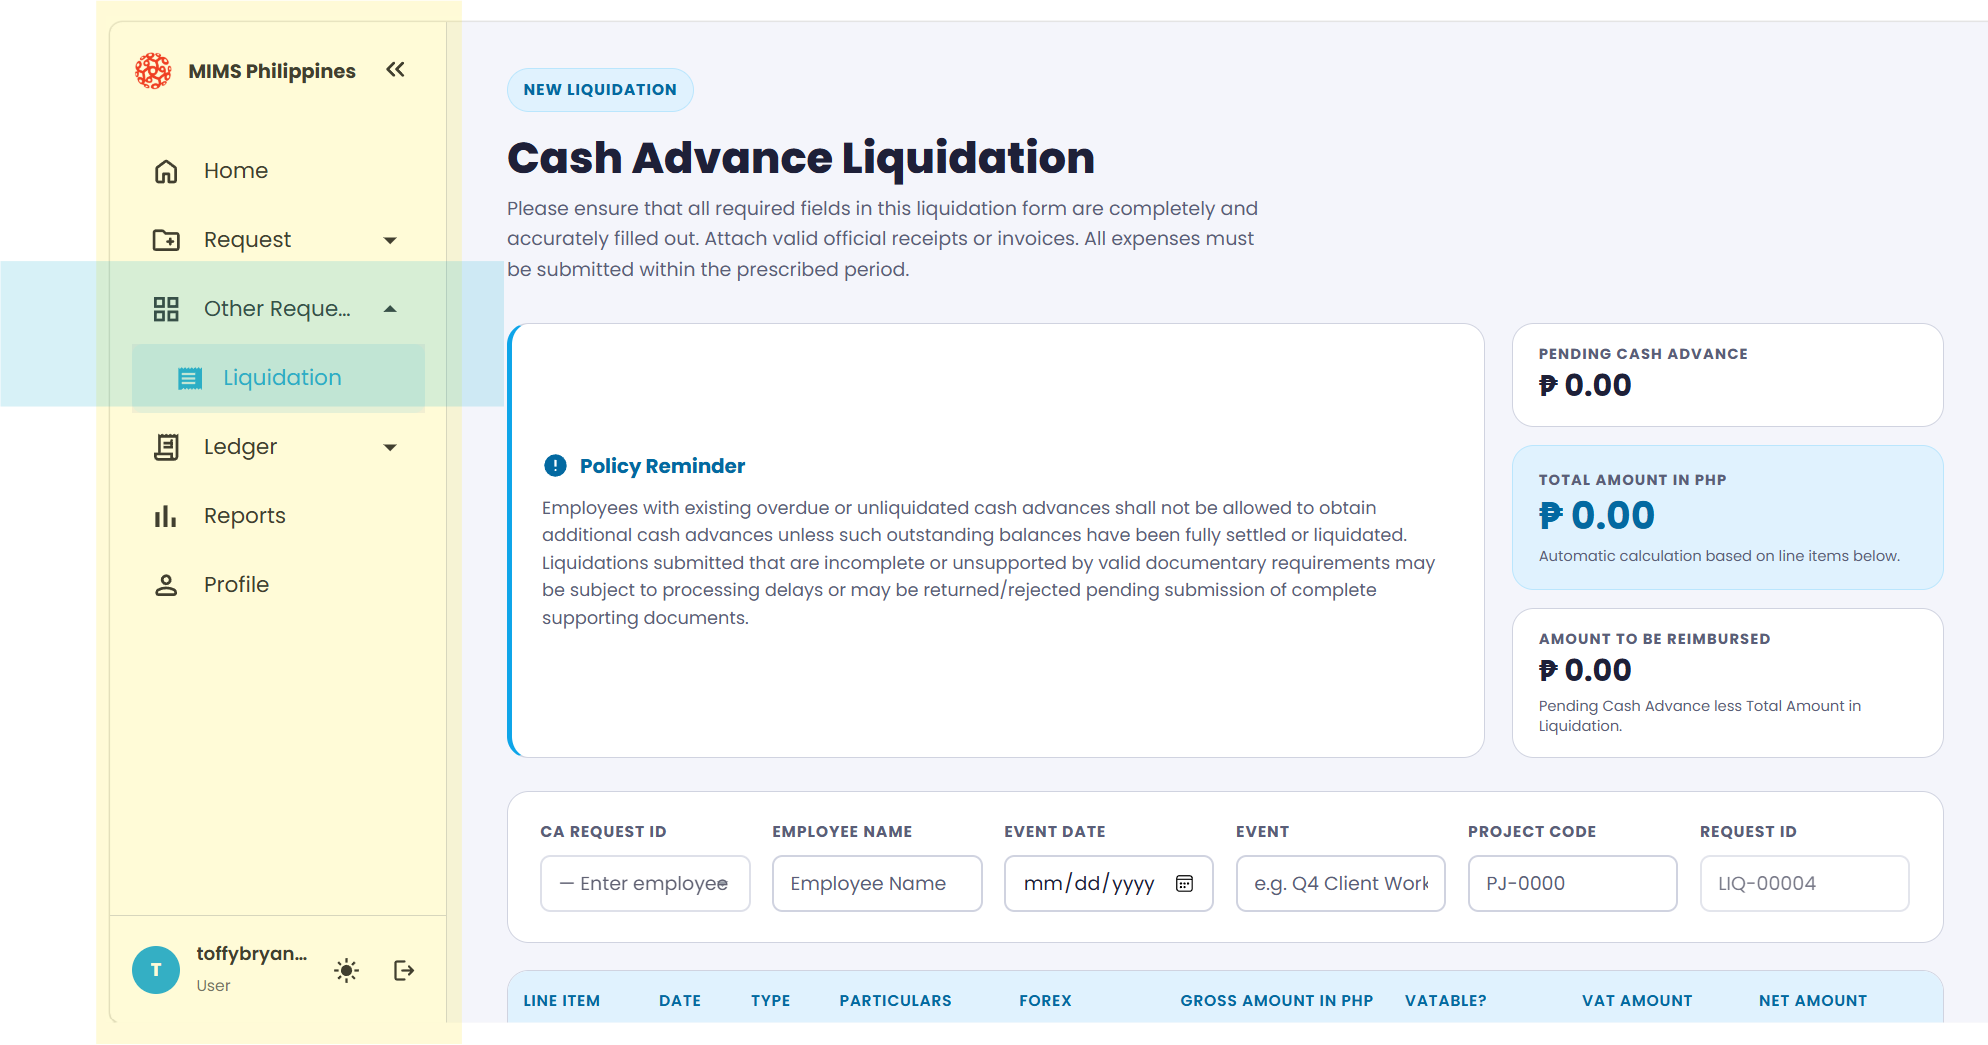
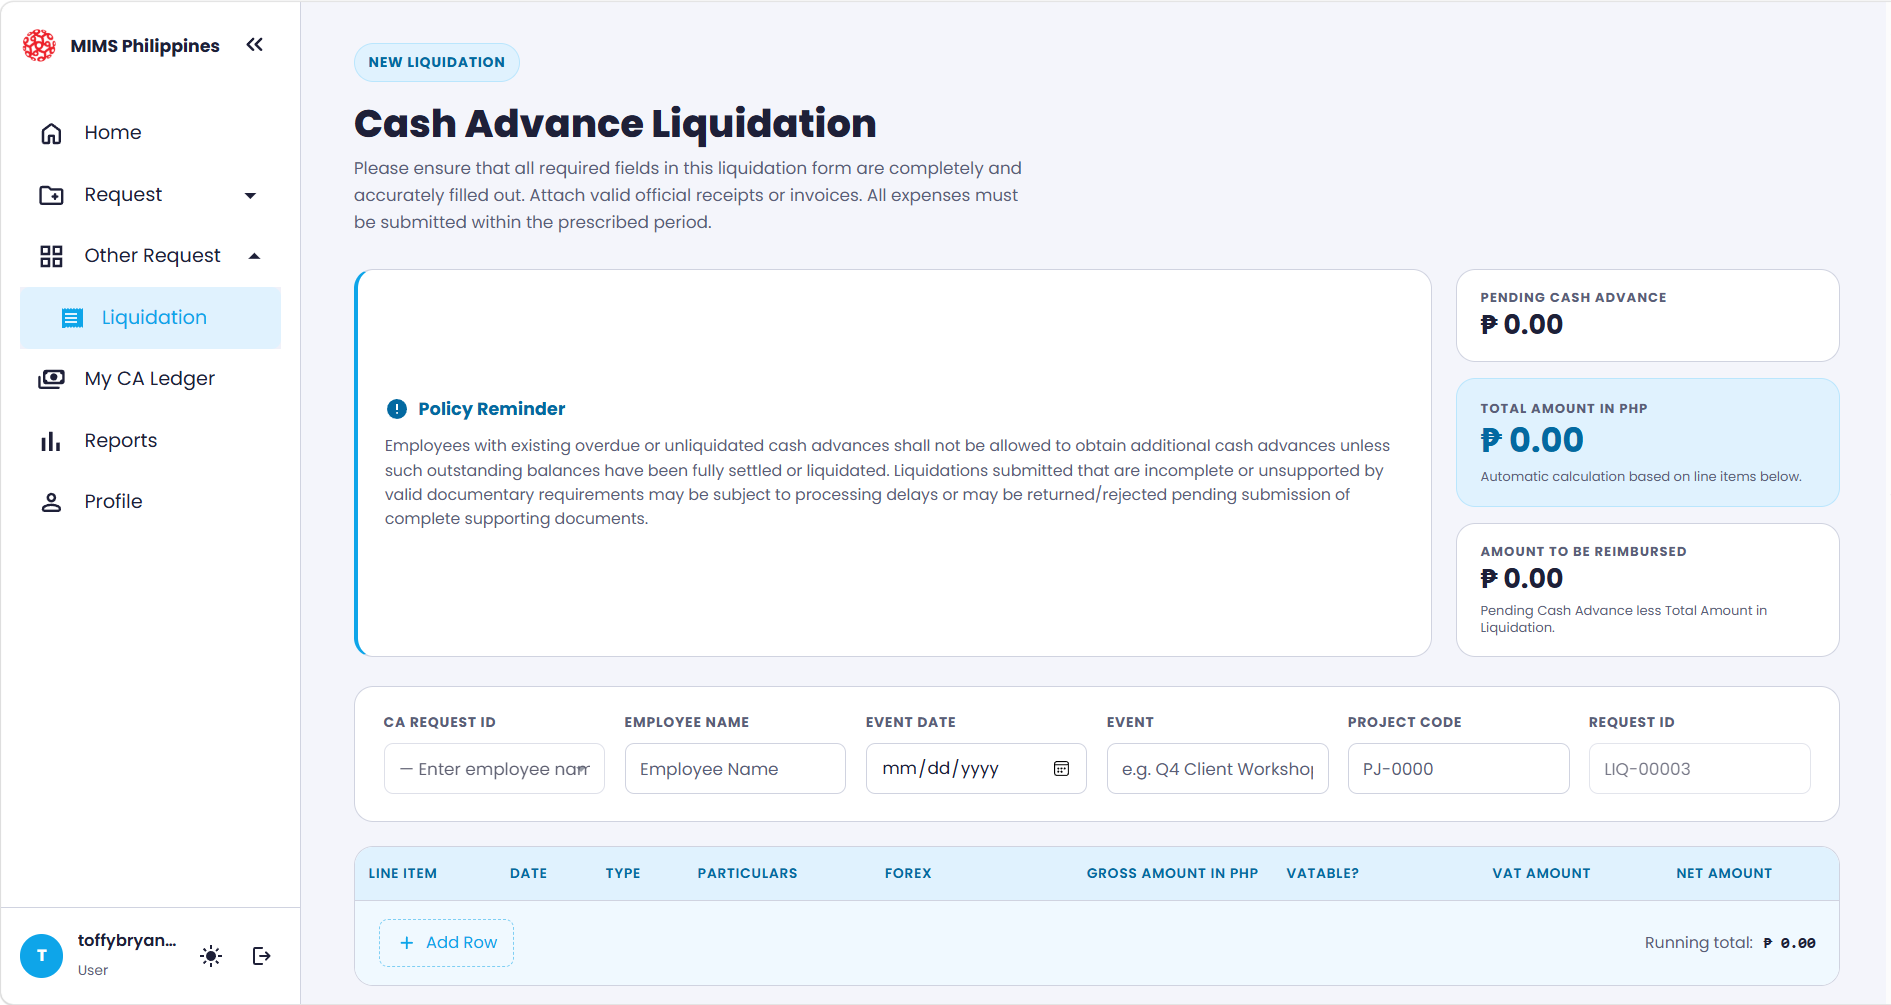
After the event or activity, you must liquidate your cash advance to account for how the funds were spent. Liquidation matches your actual expenses — backed by receipts — against the amount that was advanced, then settles whatever difference remains.
Each liquidation is tied to a disbursed cash advance, so you always settle against a specific CA- reference rather than a blank form.
Liquidate the cash advance within seven (7) days after the related event. Outstanding or unliquidated advances may be deducted from your salary under the Authority to Deduct, and can block you from requesting a new cash advance.
4.1How to access the liquidation page
To start a liquidation:
- Go to the left sidebar menu.
- Click
Other Requestand chooseLiquidation.
4.2Recording actual expenses
The Liquidation form is where you report what was actually spent. Be specific and accurate, as Finance validates each line against the attached receipts.
4.2.1CA Request ID
An automatic dropdown list that references the cash advance corresponding to the Employee Name you input.
4.2.2Employee Name
Confirm and input the employee name for the liquidation.
4.2.3Event Date / Event / Project Code
Automatic fields tied to the specific CA reference selected.
4.2.4Request ID
The auto-generated Liquidation ID — for example, LIQ-00003.
4.2.5Line Items
Click Add Row and fill in the following details for each expense:
- Date — date of the expense.
- Type — expense category (e.g., Meals, Transport).
- Particulars — description of the expense.
- Forex — currency used, if applicable.
- Gross Amount in PHP — total expense amount.
- Vatable? — indicate whether VAT applies.
- VAT Amount — VAT value, auto-calculated when applicable.
- Net Amount — calculated automatically.
Repeat this step for multiple expenses.
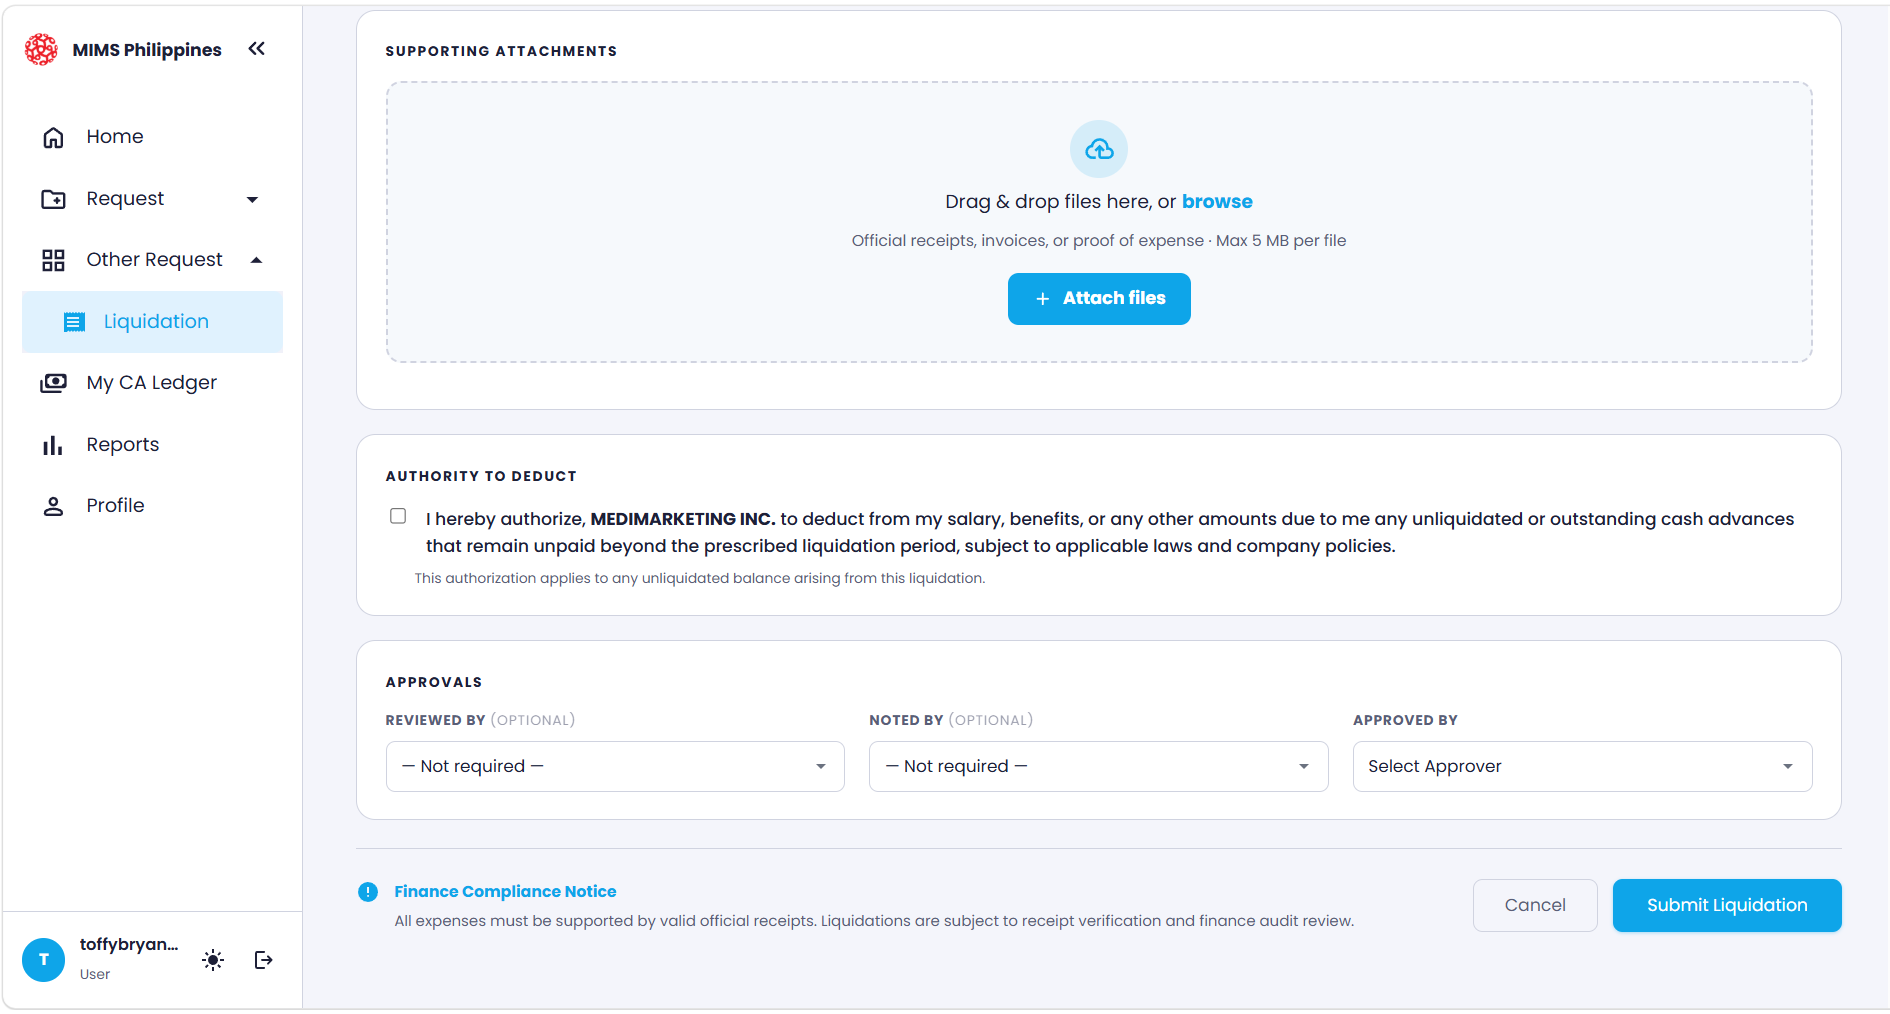
4.2.6Upload supporting attachments
Upload your receipts and documents in chronological order based on the line item number. Confirm all required documents are uploaded before submission.
Ensure files are official receipts, invoices, or proof of expense. Each file must not exceed 5 MB.
4.2.7Authorize salary deduction (if applicable)
Read the authorization statement carefully, then tick the checkbox to confirm. This allows the company to deduct any unliquidated or outstanding balances from your salary if they are not settled within the required period.
This applies only if there is a remaining unpaid balance.
4.2.8Set approval workflow
Choose the assigned approver from the dropdown list, based on your department approval matrix, and fill in the following:
- Reviewed By (optional) — select a reviewer if required, or leave as
Not required. - Noted By (optional) — select an acknowledging authority, if applicable.
- Approved By (required) — choose the assigned approver from the dropdown list.
Ensure at least the Approver field is properly selected before submission.
4.2.9Submission
Ensure that all required input fields are properly completed and validated, and carefully review all entered information for accuracy and completeness. Verify that all supporting attachments are correctly uploaded, clear, and relevant. Once confirmed, proceed to submit the liquidation request for approval.
5My Cash Advance Ledger
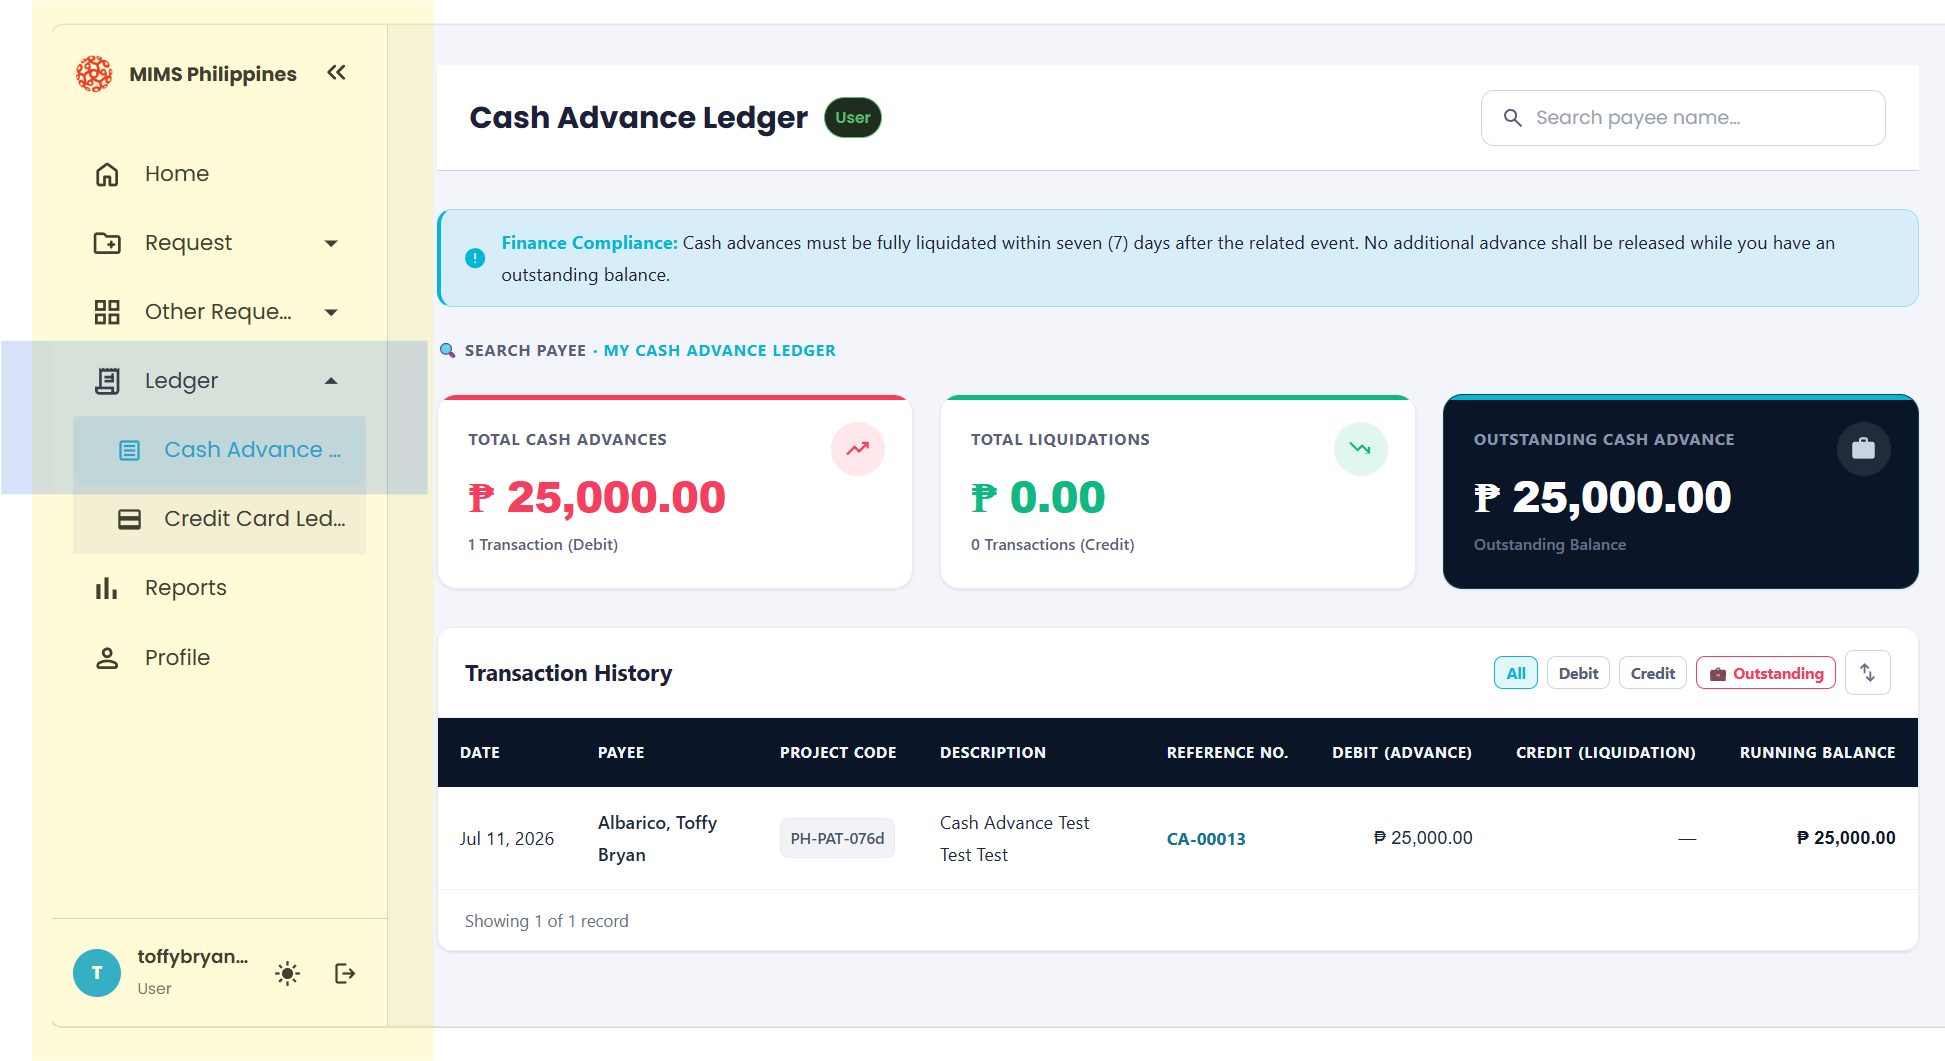
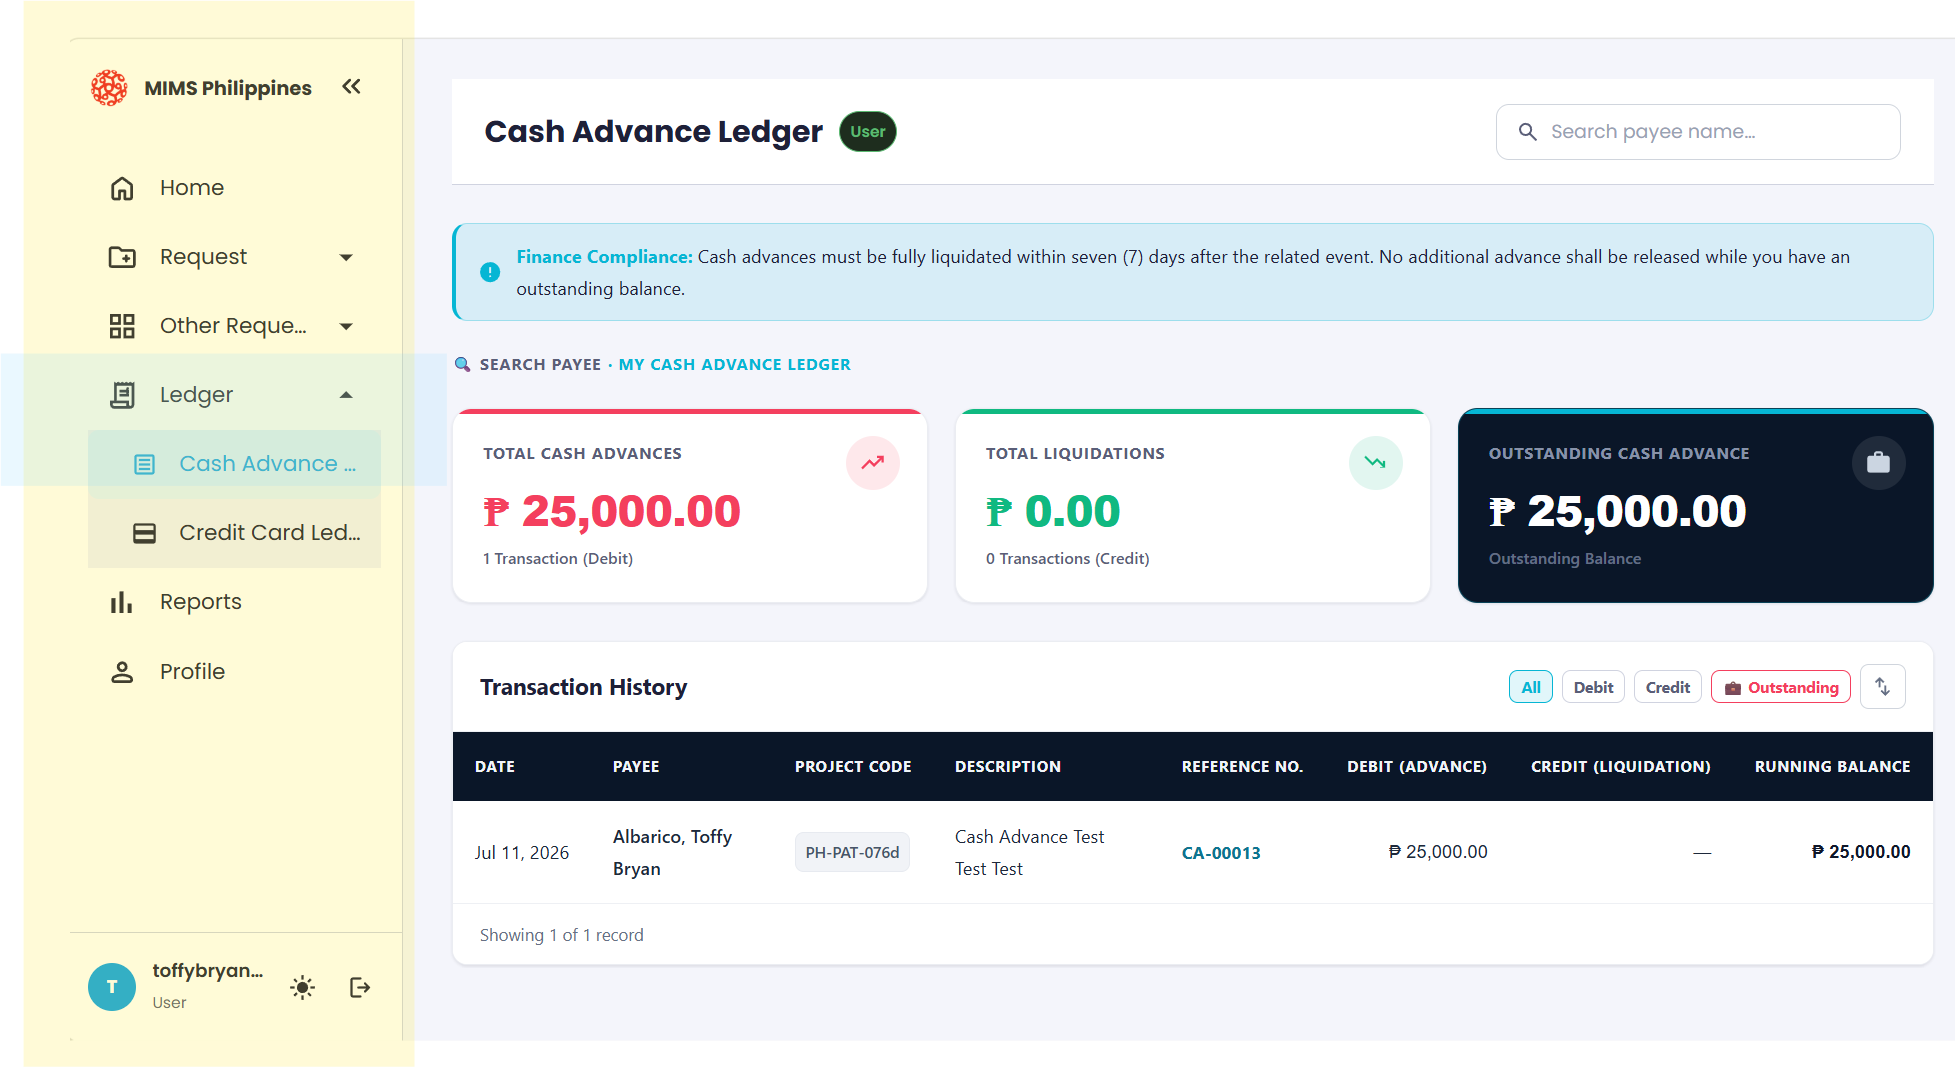
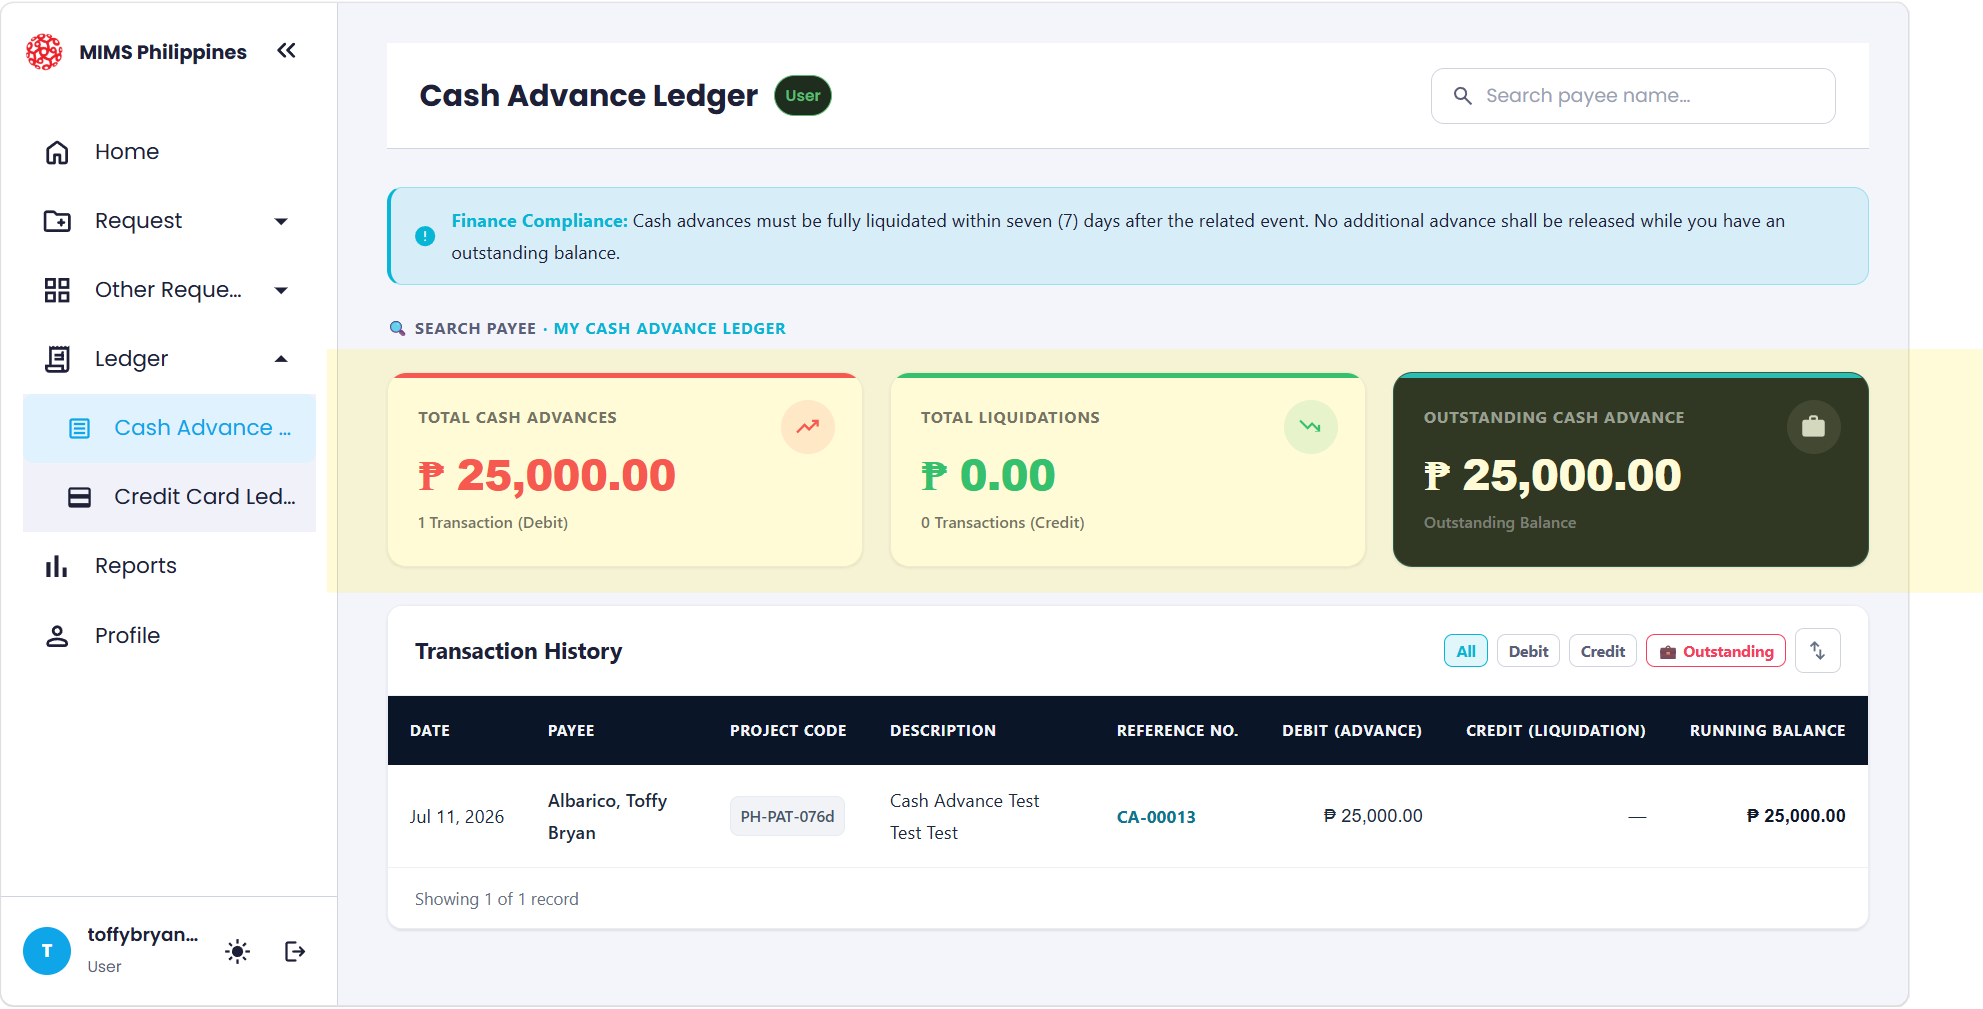
The My Cash Advance Ledger page provides a centralized view of all your cash advances. It brings together what has been released, what has been settled, and what is still outstanding — so you always know where you stand. At a glance, it shows:
- Total cash advances — the amount released to you.
- Total liquidations — the amount already settled.
- Outstanding balance — the amount still to be liquidated.
5.1How to access the My CA Ledger
To open your ledger:
- Go to the left sidebar menu.
- Click
My CA Ledger.
5.2Search function
A search bar at the top of the ledger lets you look up records by payee name. Type a name to quickly narrow the list to that person's transactions.
5.3Summary cards
Three summary cards give you the running totals across all your transactions:
- Total Cash Advances — the total amount released to you (Debit transactions).
- Total Liquidations — the total amount paid back (Credit transactions).
- Total Outstanding — the remaining unliquidated balance.
5.4Filters
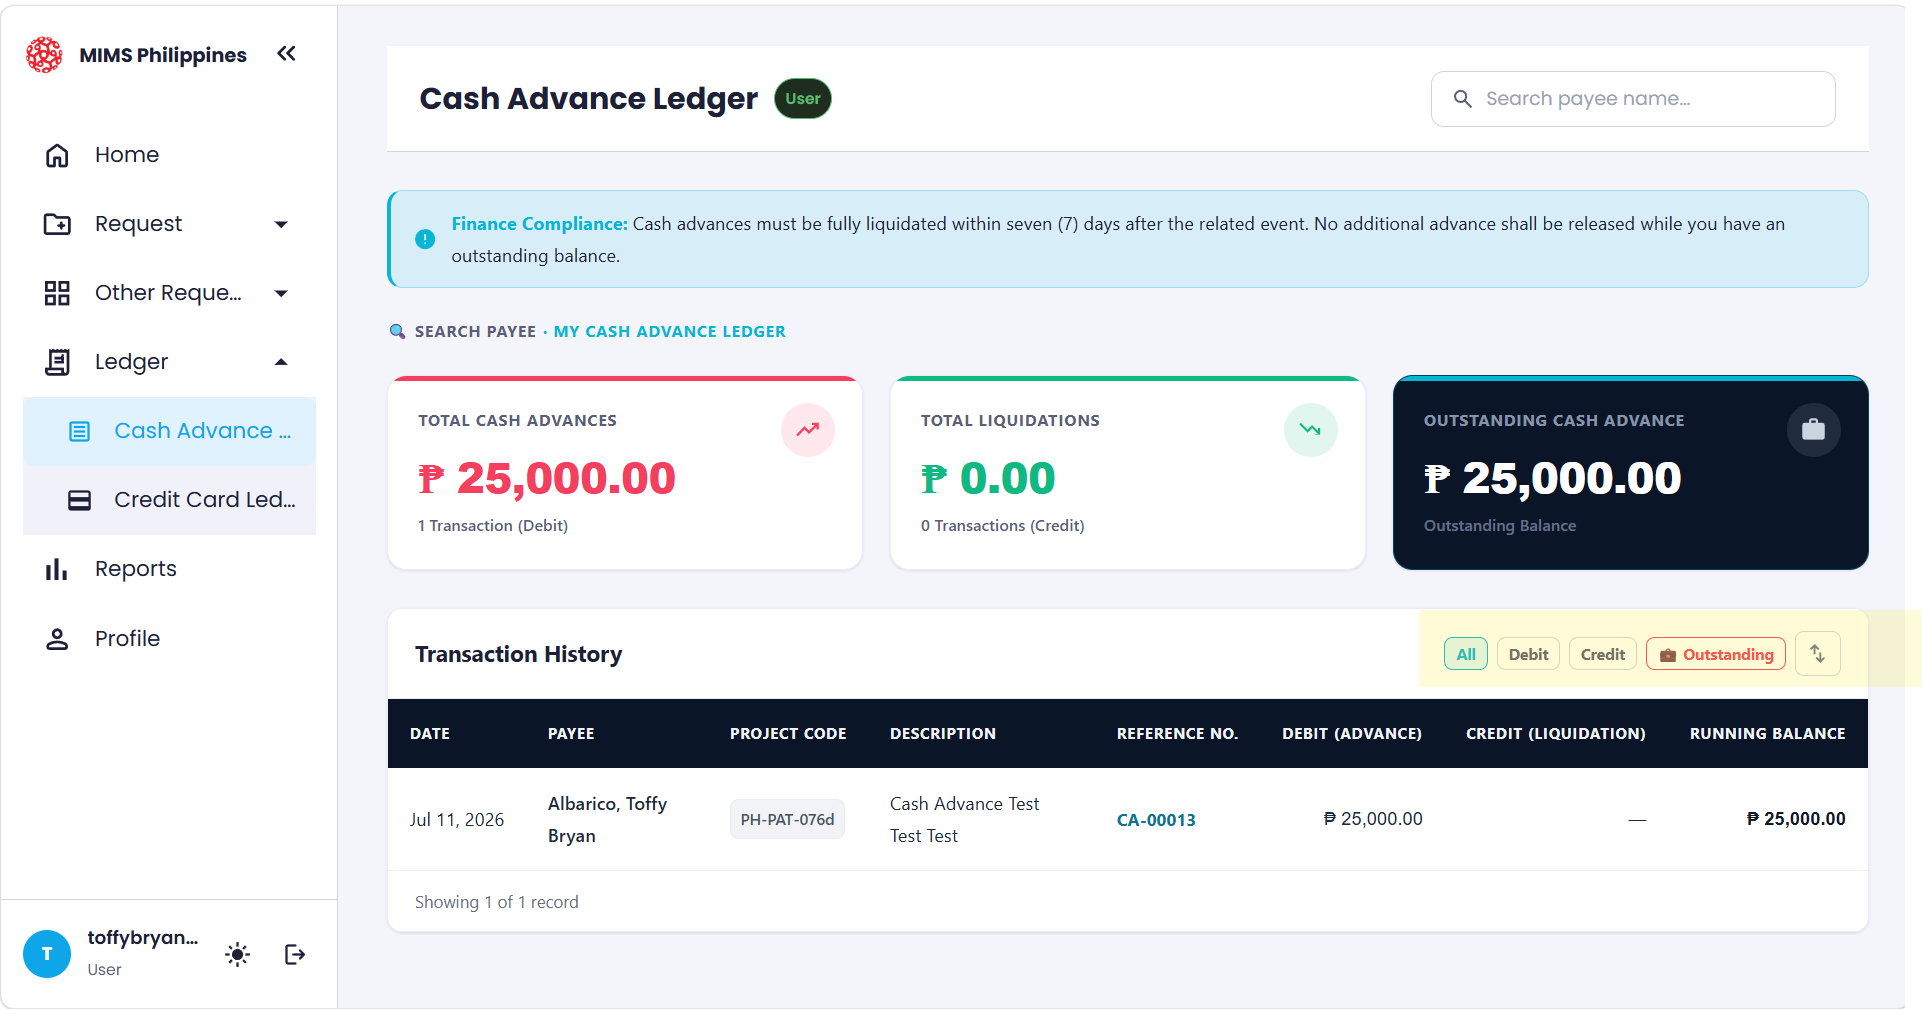
You can filter the transaction list to focus on a specific type:
- All — show every transaction.
- Debit (Advance) — show only cash advances released.
- Credit (Liquidation) — show only liquidations settled.
- Outstanding — show only unliquidated balances.
5.5Transaction type
Each ledger entry is marked as either a debit or a credit, which tells you whether the entry added to or settled your balance:
- Debit (DR) — indicates a cash advance issued.
- Credit (CR) — indicates a liquidation or deduction made against the cash advance.
6Reports Page
The Reports page is a centralized dashboard where you can monitor, review, and track all submitted requests in one place. It gives you full visibility into the approval workflow — from submission all the way to final Finance processing.
6.1How to access the Reports page
To open the page:
- Go to the left sidebar menu.
- Click
Reports.
6.2Status cards
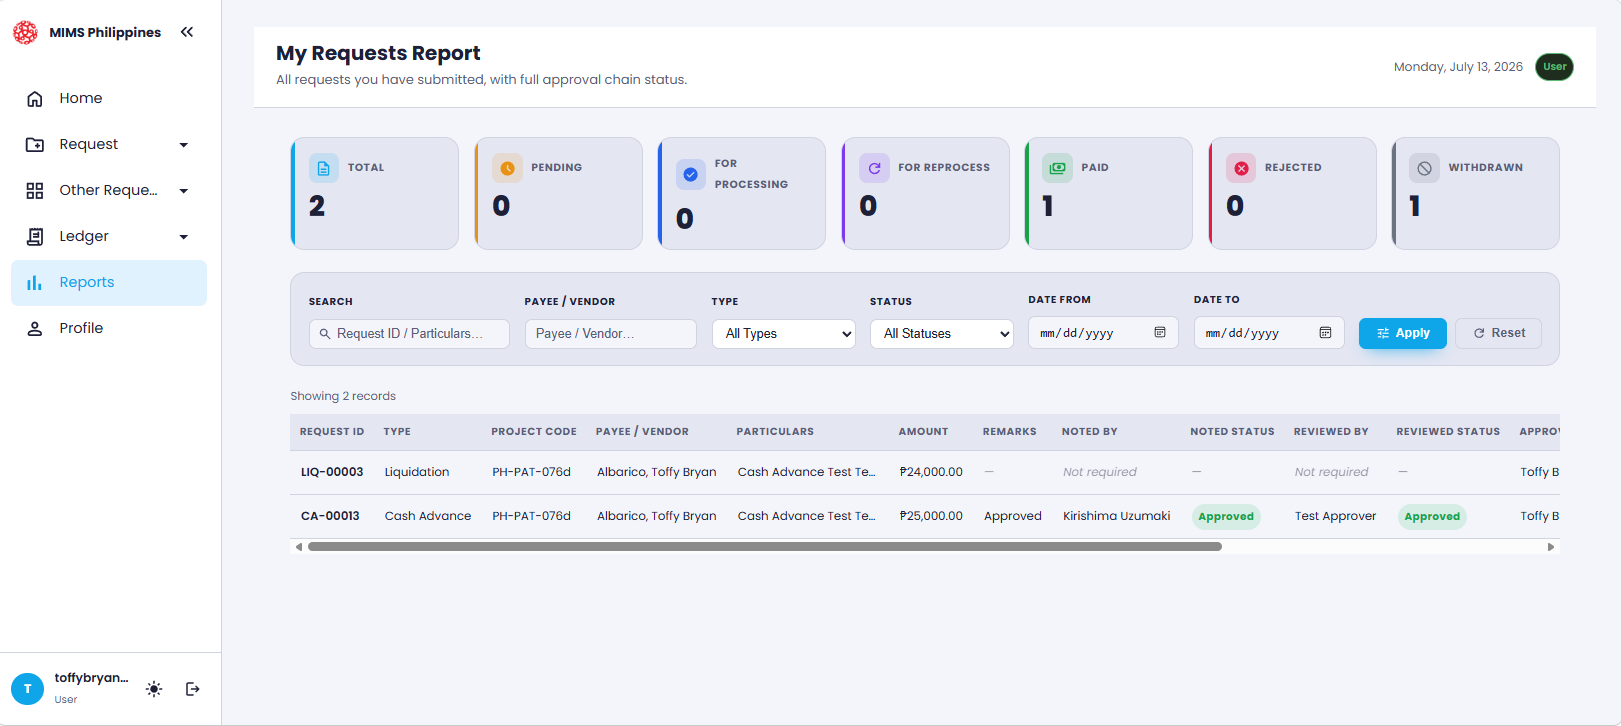
Below the page title are four summary cards showing request counts. They give you a quick snapshot of where your requests stand:
- Total — total number of requests submitted.
- Pending — requests awaiting approval.
- Approved — requests that have been approved.
- Rejected — requests that have been rejected.
6.3Filtering and search options
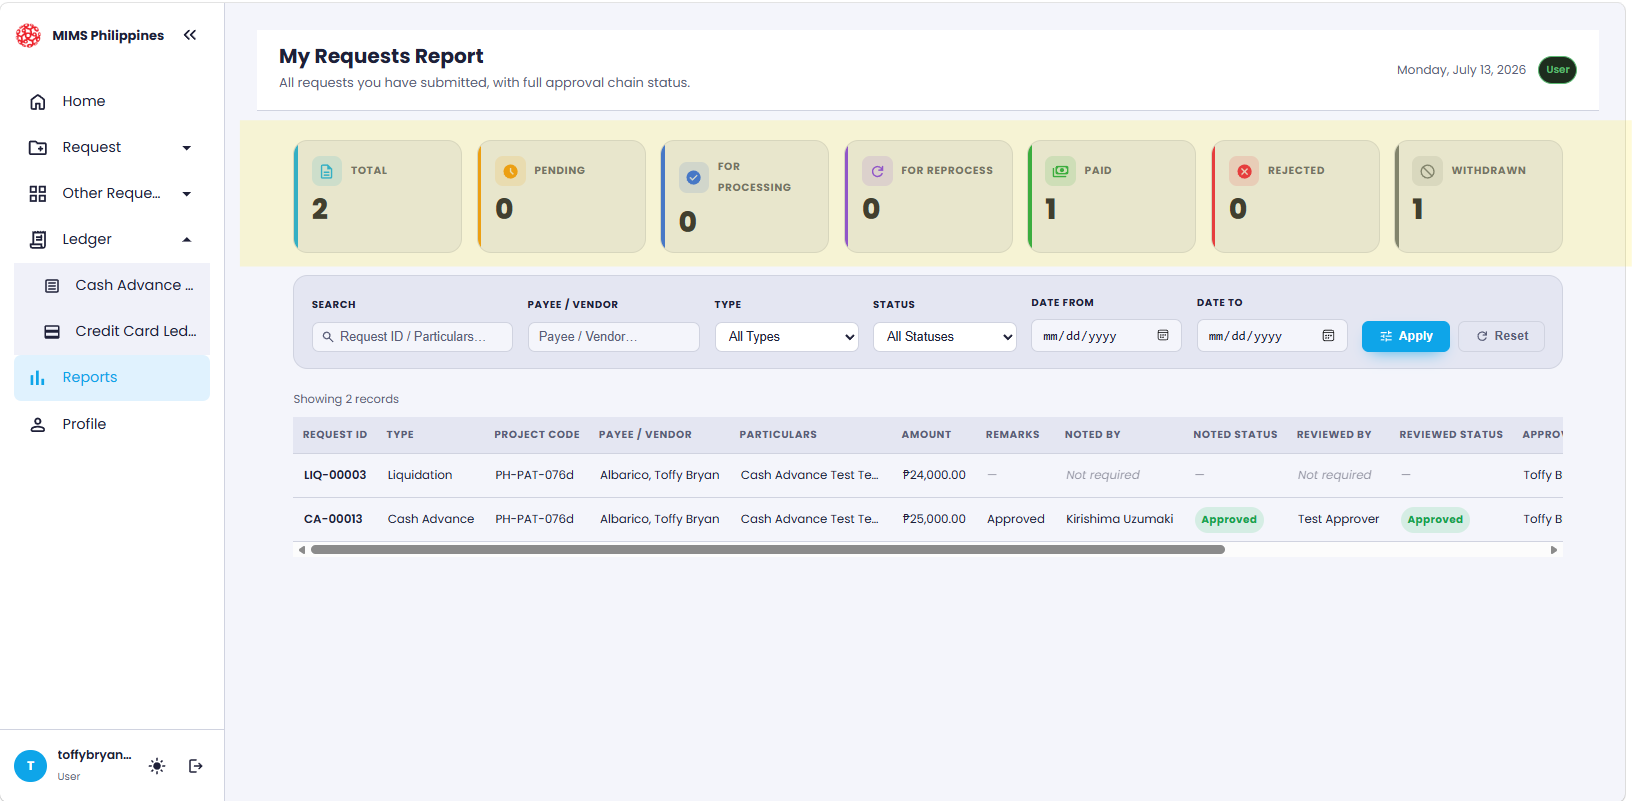
Use the filter bar to narrow the list down to the records you need. The following filters are available:
- Search — enter a Request ID or keywords.
- Payee / Vendor — filter by vendor name.
- Type — select a request type from the dropdown.
- Status — filter by request status.
- Date From / Date To — select a date range.
Once you have set your filters:
- Click
Applyto filter the results. - Click
Resetto clear the filters and show all records.
6.4Report table
The main table displays detailed information for each request. Its columns are:
- Amount — the request value.
- Remarks — notes or status remarks.
- Noted By / Status — initial review details.
- Reviewed By / Status — secondary approval stage.
- Approved By / Status — final approval details.
- Request Status — the overall status of the request.
- Finance Status — the payment status (e.g., Paid, Liquidated).
6.4.1Status indicators
Color-coded tags throughout the table let you read the state of a request at a glance:
- Approved — successfully approved.
- Rejected — denied request.
- Pending — awaiting action.
- Paid / Liquidated — green tags indicate Finance completion.